

Server settings
Server settings control the basic behavior of the DNA-Nexus installation. After the first administrator login, review these settings before creating normal users or storing production data.
Initial administrator setup
When the first administrator opens DNA-Nexus for the first time, the workspace may still be empty. Before creating normal users or uploading content, open the Admin area and review the basic server settings.
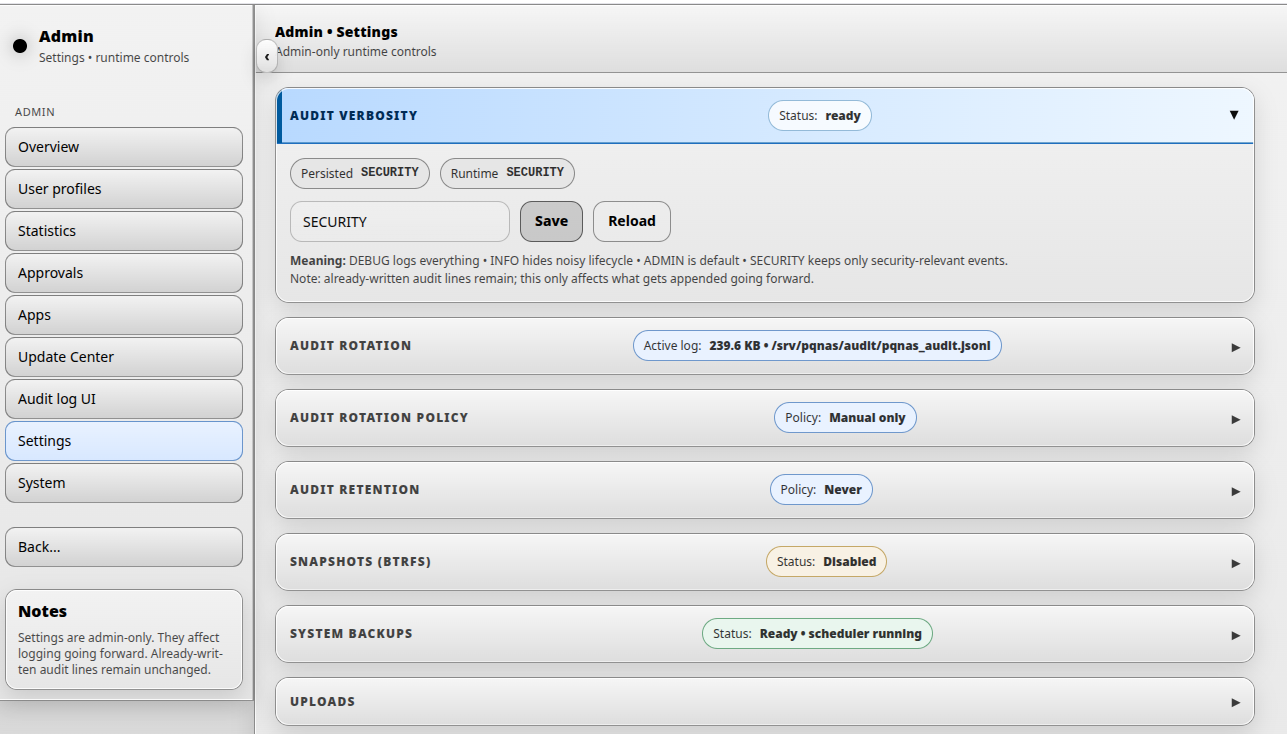
Audit verbosity
The first setting an administrator should review is audit verbosity. This setting controls how detailed the audit log should be.
The audit log is used for later review of important system activity, such as login events, administration actions, user management changes and security-relevant server events. More verbose logging can be useful during testing or troubleshooting, but it can also create unnecessary noise in normal use.
Audit log rotation and retention
Audit log rotation controls when the active audit log is archived into a rotated audit log file. Audit log retention controls how long rotated audit log files are kept.
Rotation policy
DNA-Nexus supports several audit log rotation policies. Choose the policy that matches the expected amount of audit activity on the server.
| Rotation policy | Meaning | Typical use |
|---|---|---|
| Manual | The administrator rotates the audit log manually from the audit log rotation section. | Small demo systems or installations where the administrator wants full manual control. |
| Daily (UTC) | The active audit log is rotated once per day using UTC time. | Normal installations where daily audit archives are easier to review. |
| When active log exceeds N MB | The active audit log is rotated when it grows above the configured size, for example 256 MB. | Busy servers where log size matters more than calendar days. |
| Size or daily, whichever comes first | The audit log is rotated when either the configured size limit is reached or the daily UTC rotation time arrives. | Production systems where both predictable daily archives and size limits are useful. |
Retention policy
Audit log retention defines which rotated audit log archive files should be kept. This helps prevent old audit archives from using unlimited disk space.
| Retention policy | Meaning | Example |
|---|---|---|
| Do not delete automatically | DNA-Nexus keeps rotated audit log files until an administrator removes them manually. | Useful when an external backup or compliance process manages log retention. |
| Keep last N days | Rotated audit log files older than the configured number of days can be pruned. | Keep the last 90 days. |
| Keep last N rotated files | Only the newest configured number of rotated audit log files are kept. | Keep the last 30 rotated files. |
| Keep at most N MB total | Rotated audit log archives are pruned until the total archive size is below the configured limit. | Keep at most 1024 MB of rotated audit logs. |
Preview and run pruning
Use Preview prune before deleting rotated audit logs. The preview is a dry run: it lists the files that would be deleted and estimates how much disk space would be freed.
Use Run prune now only after reviewing the preview result. This performs the actual cleanup according to the selected retention policy.
Snapshots (Btrfs)
If a DNA-Nexus data volume or storage pool uses Btrfs, the server can create filesystem snapshots for that volume. Snapshots are point-in-time views of the selected Btrfs source and can later be used for recovery through the Snapshot Manager app.
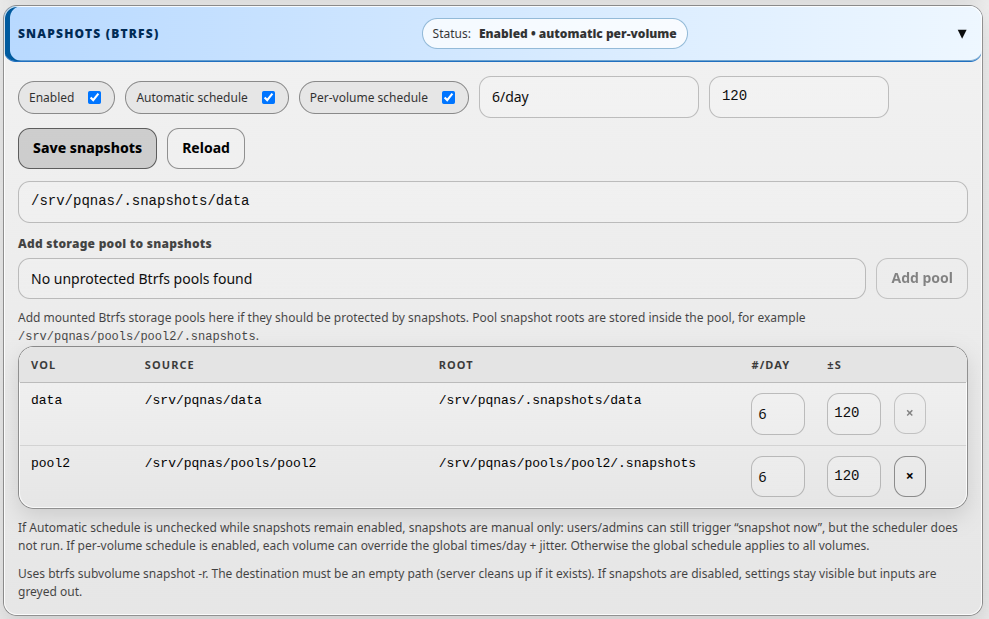
Snapshot settings
The administrator can enable or disable snapshots, choose whether snapshots are created automatically, add Btrfs storage pools to snapshot protection, and define how often snapshots should be taken.
| Setting | Meaning | Typical use |
|---|---|---|
| Enabled | Turns snapshot support on or off for the configured Btrfs snapshot volumes. | Enable this when the server should keep recoverable point-in-time copies. |
| Automatic schedule | Allows DNA-Nexus to create snapshots automatically according to the schedule. | Use this for normal installations where snapshots should be created without manual action. |
| Per-volume schedule | Allows each protected volume to override the global snapshot schedule. | Use this when some volumes need snapshots more or less often than others. |
| Times/day | Defines how many automatic snapshots should be taken per day. | For example, 1 snapshot per day for low-activity systems, or more frequent snapshots for active data. |
| Jitter (s) | Adds a small randomized delay in seconds before scheduled snapshot jobs run. | Use jitter to avoid all snapshot jobs starting at exactly the same second. |
| Add storage pool to snapshots | Adds a mounted Btrfs storage pool to the protected snapshot volume list. | Use this when user data, workspace data, media, or app data has been moved to a separate storage pool. |
| Snapshot root | Shows where snapshots for that volume are stored. | For normal pool snapshots, keep the snapshot root inside the same pool, such as /srv/pqnas/pools/pool2/.snapshots. |
| Remove | Removes a volume from future snapshot scheduling. | Use this only when that volume no longer needs new snapshots. Existing snapshots are not deleted automatically by removing the volume from the settings list. |
Protected volumes and storage pools
The snapshot table lists each protected volume, its source path, its snapshot root, and optional per-volume schedule values. The default data volume usually points to /srv/pqnas/data. Additional pools usually point to paths such as /srv/pqnas/pools/pool2.
When a pool is added to snapshot protection, DNA-Nexus stores that pool's snapshots inside the pool. This keeps the Btrfs snapshot on the same filesystem as the source, which is required for normal Btrfs subvolume snapshots.
Manual snapshots
If automatic scheduling is disabled while snapshots remain enabled, snapshots are manual only. In that mode, users or administrators can still trigger snapshot creation from Snapshot Manager, but the scheduler does not run automatically.
Snapshot Manager app
The settings page controls whether snapshots are enabled, which volumes are protected, and how the automatic schedule works. Actual snapshot management is done in the separate Snapshot Manager app. From Snapshot Manager, administrators can review available snapshots, create a snapshot immediately, inspect snapshot details, and perform recovery operations such as restoring data from a snapshot.
System Backups
System Backups protect the critical DNA-Nexus server configuration and internal system state. They are small backups created by the system backup worker.
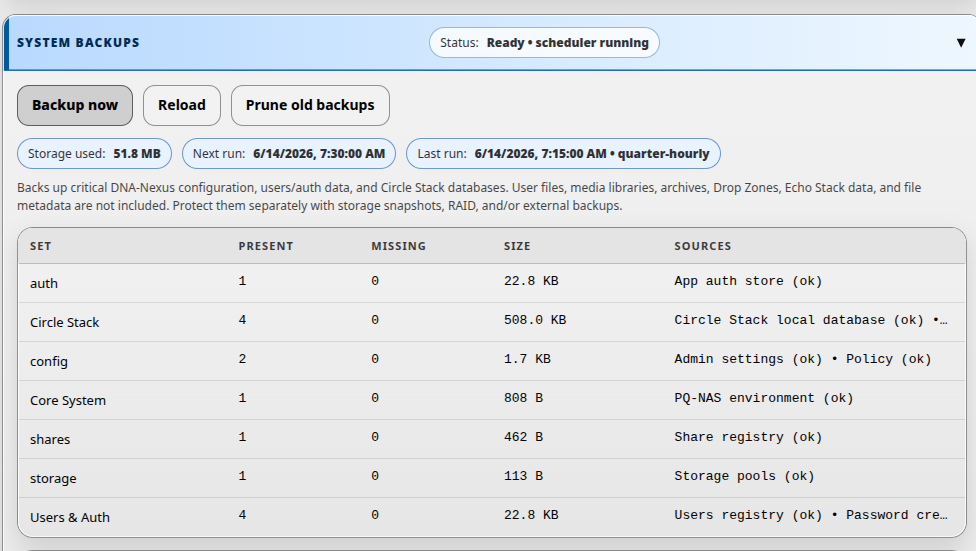
What is included
System Backups include important server-side configuration and internal state, such as the DNA-Nexus environment file, admin settings, policy configuration, users/auth data, app auth data, share registry, storage pool configuration and Circle Stack databases.
Sensitive environment values are redacted before the environment file is copied into the backup archive.
Backup tiers
The scheduler creates several backup tiers. The backup list shows which tier each backup belongs to.
| Tier | When it runs | Default retention |
|---|---|---|
| quarter-hourly | Every 15 minutes | 24 hours |
| hourly | On the hour | 7 days |
| daily | At 03:00 | 30 days |
| weekly | Sunday at 03:00 | 12 weeks |
| manual | When an administrator clicks Backup now | Kept until an administrator removes it |
Controls
Use Backup now to create a manual system backup immediately. Use Reload to refresh the backup status and list. Use Prune old backups to remove scheduled backups that are older than the retention policy. Manual backups are not removed by automatic retention.
Status fields
- Storage used shows how much disk space the system backups currently use.
- Next run shows when the scheduler will run next.
- Last run shows the most recent scheduler result or error.
- Set shows each protected backup group.
- Present and Missing show whether expected sources were found.
- Sources lists the files or databases included in each group.
Uploads
If the server has a fast SSD or another fast internal storage pool, it can be used as landing storage for uploads. In this model, new uploads land first in a fast pool, and the server later moves them to their final storage locations according to the upload tiering policy.
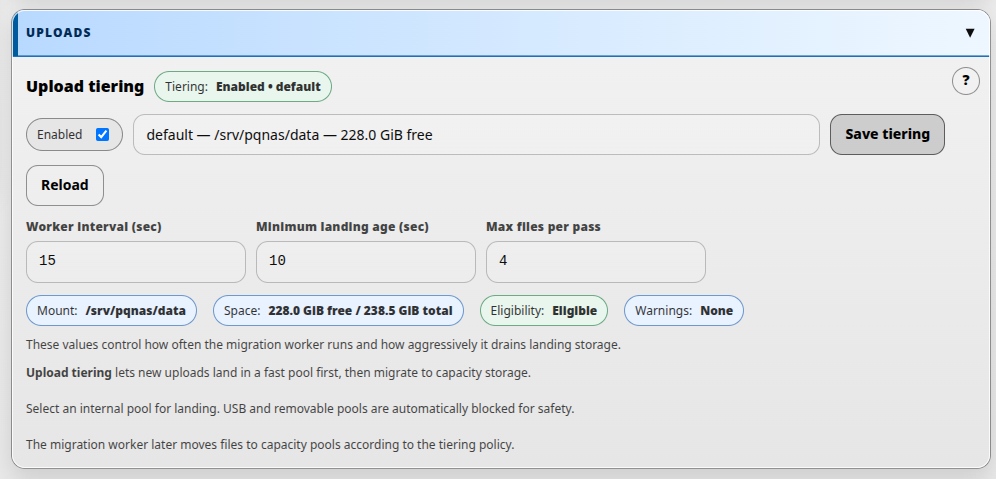
How upload tiering works
When upload tiering is enabled, the selected landing pool receives newly uploaded files first. A background migration worker then moves those files from landing storage to capacity storage according to the configured tiering policy.
Only internal pools should be used for landing storage. USB or removable pools are blocked automatically for safety.
Choosing worker values
The worker settings control how often the migration worker runs and how aggressively it drains landing storage. Smaller values make migration more responsive, while larger values reduce background activity.
Example values for a small or moderate installation could be a worker interval of
60 seconds, a minimum landing age of 60 seconds and a maximum
of 8 files per pass. Busier servers may need different values depending on
disk speed, upload volume and the capacity storage layout.
Upload tiering settings
| Setting | Meaning | Typical use |
|---|---|---|
| Enabled | Turns upload tiering on or off. | Enable this when the server has a fast landing pool available. |
| Landing pool | The internal storage pool where new uploads arrive first. | Select a fast SSD-backed pool when possible. |
| Worker interval (sec) | How often the migration worker wakes up and checks whether files should be moved. | Use a short interval for responsive migration behavior. |
| Minimum landing age (sec) | The minimum time a file stays in landing storage before it becomes eligible for migration. | Use a small buffer so uploads are not moved immediately while still being written. |
| Max files per pass | The maximum number of files the migration worker moves during one pass. | Use this to control how aggressively landing storage is drained. |
Status information
The upload tiering section also shows helpful runtime status information:
- Mount shows the selected landing path or mountpoint.
- Space shows available and total capacity for the landing pool.
- Eligibility shows whether the selected pool can be used for upload landing.
- Warnings shows whether the server has detected a problem with the current configuration.
When to use it
Upload tiering is most useful when the server has a small fast SSD for incoming writes and a larger slower capacity pool for final storage. It can improve the user experience by making uploads complete quickly while the server handles migration in the background.
Language and theme
At the end of the initial administrator setup, the administrator can choose the preferred UI language and visual theme.
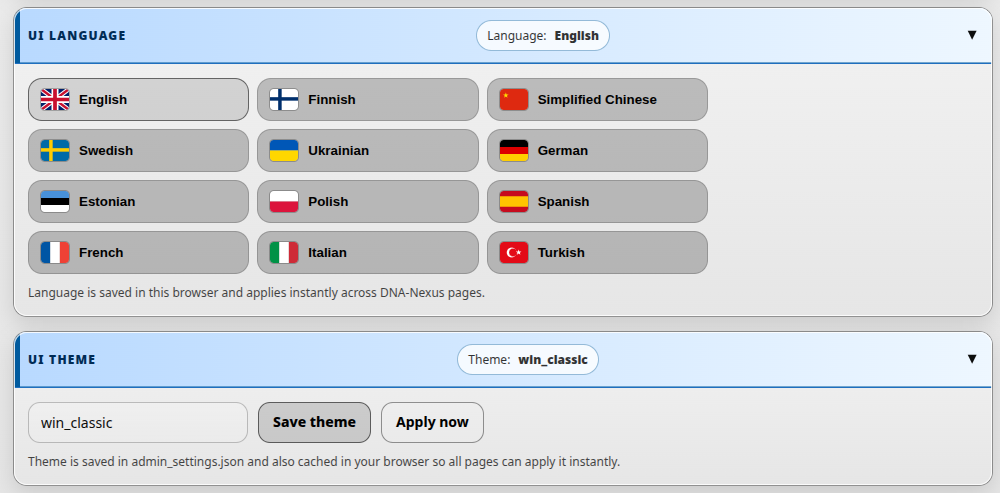
UI language
The language selection controls the language used by the current administrator in this browser. It also helps define the default language experience for other users, but each user can choose their own language separately.
UI theme
The theme setting controls the visual appearance of the DNA-Nexus interface. Available themes may change over time, so this guide does not list every theme by name.
After selecting a theme, save it. Some pages may apply the theme immediately, while others may require a page refresh.
Verify initial settings
After reviewing the administrator settings, confirm that the most important first-run choices have been saved intentionally.
-
Audit settings are selected
Confirm that audit verbosity is set to the intended level. For most installations, SECURITY is a good default. Also confirm that audit rotation and retention match the support or compliance policy.
-
Snapshot policy is understood
If Btrfs storage is used, confirm whether snapshots are enabled and whether they should run automatically or only manually.
-
System Backups are running
Confirm that System Backups show a healthy status, a next scheduled run, and no unexpected missing critical sources.
-
Upload tiering is intentional
If upload tiering is enabled, confirm that the selected landing pool is internal, eligible and has enough free space.
-
Language and theme are set
Confirm that the administrator UI language and visual theme are comfortable to use. Other users can still choose their own language separately.